Description of the Thermocouples
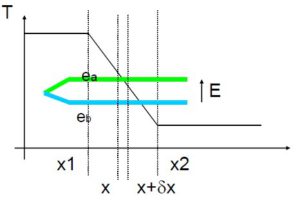
When two different materials are welded together to make a junction and heated up, an electromotive force (EMF) is generated make the measurement of temperature possible.
The EMF generation uses the Seebeck effect.
The thermocouples measure temperature differences.
The EMF are generated in Temperature gradients.
The sensitivity of the thermocouple is the sum of the thermoelectric power of each conductor.
The advantage of a higher EMF means a better temperature resolution.
The thermocouples are standardized. The basic values of the EMF and the tolerances are laid down in the IEC584-1+2 standards.
Thermocouples cover a temperature range from -200°C to +2300°C.
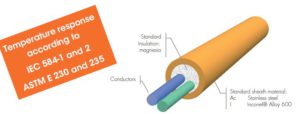
The essential THERMOCOAX thermocouple construction is that both conductors, insulation and metal protecting sheath are combined as a cable :
- The two wires make the thermoelectric pair
- The mineral insulator is a highly compacted powder
- The continuous metal sheath provides the mechanical and chemical protection of the pair.
At the end, the cores and the sheath are welded and constitute the junction.
For the aerospace industry and more recently for the automotive industry, the heat treatment of high end materials has to conform to the ASM 2750 E and CQI-9 standards respectively.
Those standards give the pyrometric requirements for thermal processing equipment used for the heat treatment of metal parts.
The System Accuracy Tests (SATs) and the Temperature Uniformity Surveys (TUS) are key parts of state of the art heat treatment operations.
The SAT is performed to assure the accuracy of the furnace control and recording system in each controlled zone.
TUS shall be performed to measure temperature uniformity and to establish the acceptable work zone and qualified operating temperature range(s).
Thermocouples shall be installed in the thermal processing equipment within the work zone or as close as possible to it.
The load sensors are attached to or in contact with production material.
Those temperature homogeneity standards concern atmospheric pressure (air) furnaces as well as vacuum furnaces.
The homogeneity of the furnace temperature depends on the quality and accuracy of the measuring instruments used.
When choosing survey TCs, their maximum correction factor needs to be below the required specification and tolerances of the furnace.
To meet the demanding requirements of heat treatment applications, thermocouple types R / S / B / J / T / E / K / N / C have to conform to precise calibration requirements, especially in terms of tolerance.
Tolerance values are governed by standards, such as NF EN 60584-1 and ASTM E230.
The ASTM E230 “Special tolerance” is more restrictive than the NF EN 60584 “Class 1” below 375°C.
Tolerance values are given as a deviation in degrees Celsius or a function of temperature. The larger value is applicable.
For example, for K type thermocouples, the special tolerance value to conform to the ASTM E230 is +/-1.1°C or 0.4%
SAT & TUS thermocouples must be calibrated every 6 months for Type B, R & S and every 3 months for N & K thermocouples. The allowed error is +/- 1.1 ° C or + / 0.4% for SATs thermocouples and +/- 2.2 ° C or +/- 0.75% for TUS thermocouples.
We also talk about tolerance classes for thermocouples.
Thermocoax inspects the whole thermocouple production chain.
The mineral insulated cables that represent the core of the technology, are manufactured in the French factory of Athis de l’Orne (61).
Furthermore, THERMOCOAX has its own calibration laboratory certified by a national COFRAC accreditation No.2-1384 with an international recognition.
If required, we can deliver a COFRAC calibration certificate for each thermocouple manufactured.
- Calibration Laboratory – COFRAC Certified
- CERTIFICATE No. 2-1384 rev. 3
- International recognition
- Range of validity accessible on the COFRAC website
http://www.cofrac.fr/annexes/sect2/2-1384.pdf
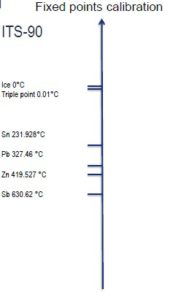
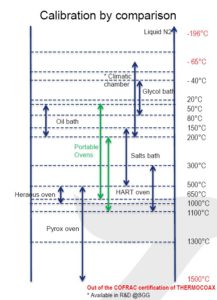
To offer the full range of temperature calibration points for heat treatment manufacturing, we use two different calibration process: The fixed points calibration and the calibration by comparison.
THERMOCOAX owns a wide range of means for calibration by comparison, as well as by fixed points. This variety of equipment allow us to perform comparisons between the different measuring instrument in order to ensure the validity of our results and our uncertainties. We also frequently perform inter-laboratory comparisons in accordance with the international standard EN ISO/IEC 17043.
Our team of specialists with our 60 years of experiences in thermal applications and in the management of regulatory requirements of the aerospace and automotive industry, gives us an international reputation.
The quality of the thermocouples, the homogeneity of the production and a high-performance calibration process, make it possible to improve reliability and efficiency of the heat treatment plants.

